Shopify Flow Integration
CrazyRocket can send a Flow trigger event to your Shopify store every time a customer joins one of your campaigns. Use Shopify Flow to automate follow-up actions like sending emails, adding tags, updating metafields, creating segments, and connecting with hundreds of Shopify apps.
Shopify Flow is a free automation tool built into Shopify. It lets you create workflows using a simple Trigger → Condition → Action model. CrazyRocket provides the trigger — you decide what happens next.
1. Enable Shopify Flow in CrazyRocket
Open Your Campaign Settings
Go to Campaigns and open the campaign you want to connect to Shopify Flow. Scroll down to the Global Settings tab. Find the "Enable Shopify Flow Trigger" switch and turn it on. An info panel will appear confirming the integration is active.
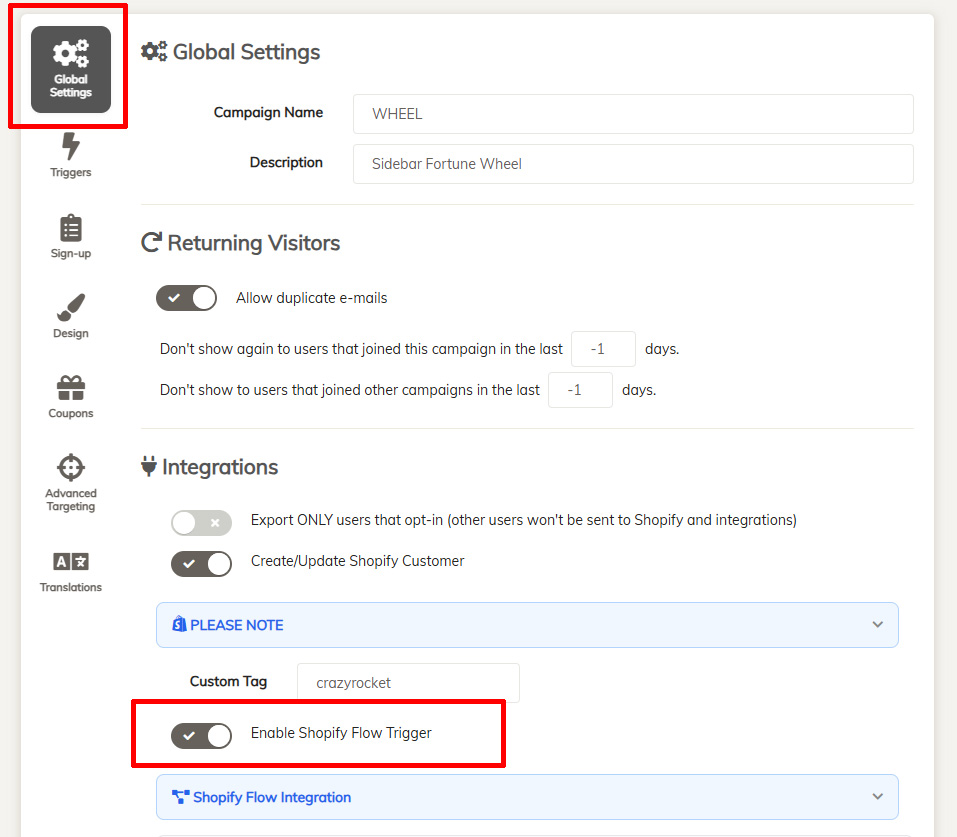
Save your campaign. From now on, every time a customer joins this campaign, CrazyRocket will send a trigger event to Shopify Flow.
2. Create a Flow in Shopify
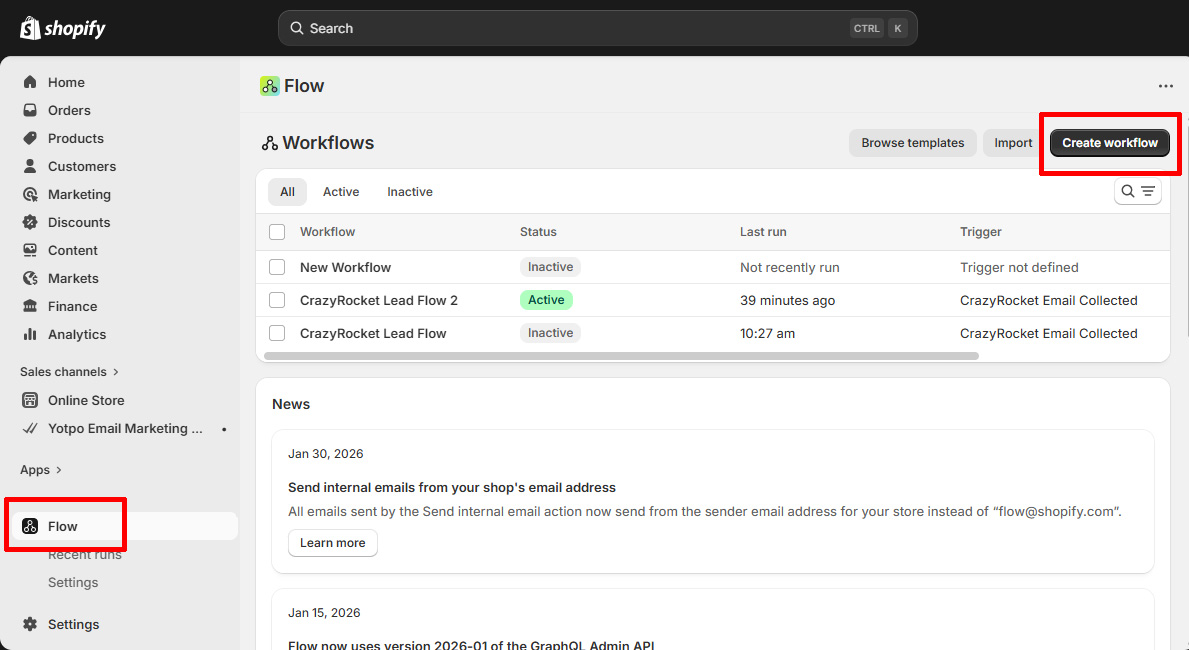
In your Shopify Admin, go to Flow (or search for "Flow" in the search bar). Click "Create workflow".
3. Select the CrazyRocket Trigger
Click "Select a trigger", then browse "Installed apps" and pick CrazyRocket. Select the trigger named "CrazyRocket Email Collected".
4. Send a Test Event
Go back to CrazyRocket, open your campaign settings and expand the Shopify Flow info panel.
Enter a test email address and click "Send Test Event".
This fires a sample trigger to your Shopify store so you can verify the connection and inspect the data inside Shopify Flow.

Every trigger event includes the following data. You can use any of these fields as conditions or inputs in your Flow workflow:
| Field | Description |
|---|---|
| Customer Email | The email address the customer entered |
| Customer Name | Full name (if collected) |
| Customer Phone | Phone number (if collected) |
| Customer Id | The Shopify customer numeric ID |
| Coupon Code | The unique coupon code assigned to the customer |
| Master Coupon Id | The original discount code used to generate the unique coupon |
| Reward Description | The label of the prize (e.g. "10% Off") |
| Campaign Name | The name of the campaign |
| Campaign Tag | The custom tag set on the campaign (if any) |
| Opted In Marketing | Whether the customer opted in to email marketing |
| Opted In Sms | Whether the customer opted in to SMS marketing |
5. Build Your Workflow
Once the trigger is in place, you can build any workflow you need using conditions and actions.
Conditions
Add conditions to filter which events run the workflow. For example:
- Only run when Opted In Marketing is true
- Only run for a specific Campaign Tag
- Only run when a Coupon Code is not empty
Actions
Add one or more actions to execute when the trigger fires. Some popular examples:
- Add customer tags — Tag customers who joined a campaign (e.g. "crazyrocket-lead")
- Send internal email — Notify your team when a high-value coupon is claimed
- Update customer metafield — Store the coupon code on the customer profile for later use
- Send marketing email — Send a follow-up email via Shopify Messaging (see section 6 for details)
- Connect to third-party apps — Send data to any app connected to Shopify Flow
When your workflow is ready, click "Turn on workflow" in the top right corner to make it live.
6. Using Shopify Messaging with Flow
Shopify Messaging (previously called Shopify Email) cannot use the data received from triggers directly.
This means you cannot insert the coupon code into your email template using the trigger data alone.
To handle the coupon, you must implement the workaround described below.
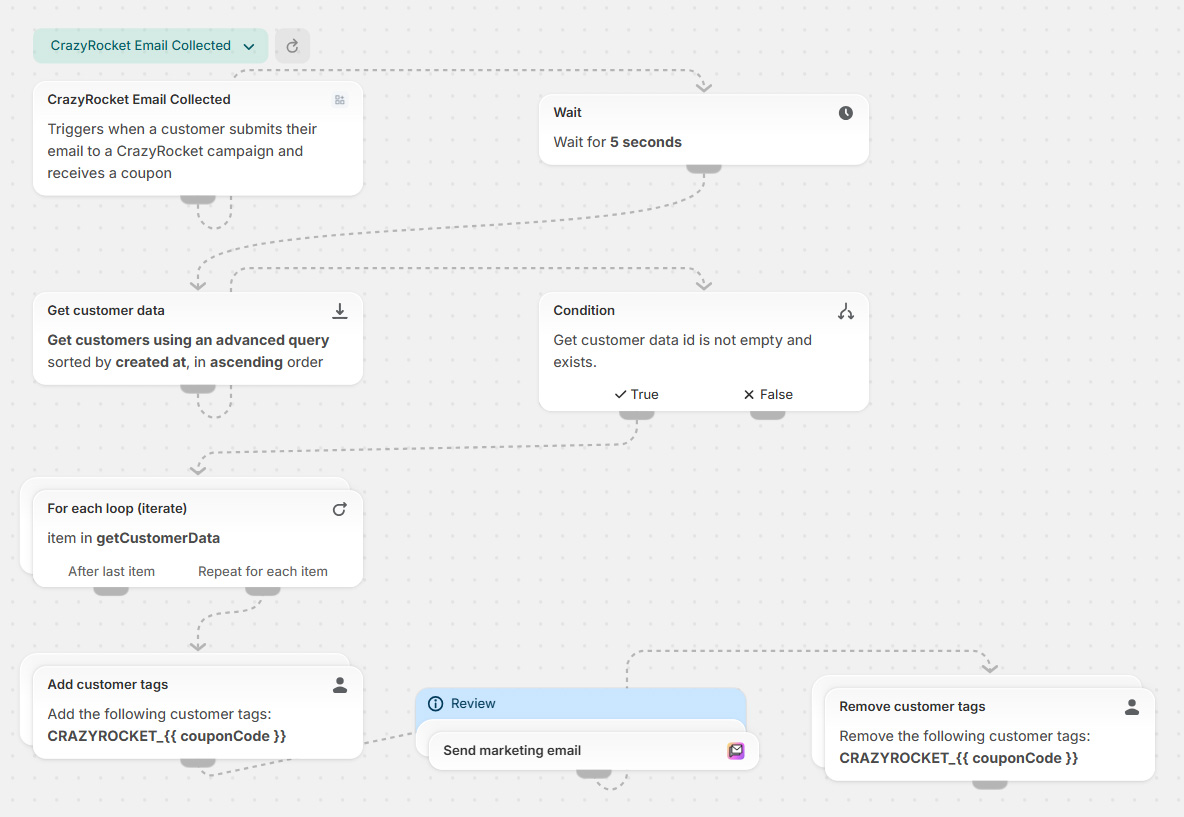
The idea is simple: store the coupon code as a customer tag, then use custom Liquid inside the email template to pull the code from the tag. Here is the full flow:
Don't want to build it from scratch?
Download the pre-built flow and import it directly into Shopify.
Note: the imported flow is missing the CrazyRocket Email Collected trigger at the top and the Send marketing email action block — you must add both manually after importing.
Step 1: Add the CrazyRocket Trigger
Create a new workflow and select "CrazyRocket Email Collected" as the trigger (same as section 3 above).
Step 2: Wait 5 Seconds
Add a "Wait" action set to 5 seconds. This gives Shopify time to finish processing the new customer internally — especially important if CrazyRocket just created the customer record.
Step 3: Get Customer Data
Add a "Get customer data" action and use the Customer Id field from the trigger to look up the customer.
Step 4: Check That the Customer Exists
Add a condition to verify the customer was found. This protects the rest of the workflow from failing if the customer record doesn't exist yet.
Step 5: Tag the Customer with the Coupon Code
Add an "Add customer tags" action and set the tag to CRAZY_{{ couponCode }}.
This stores the coupon code on the customer profile so we can retrieve it inside the email template using Liquid.
Step 6: Send the Email with Shopify Messaging
Add a "Send marketing email" action. Inside your email template, use the following custom Liquid snippet to extract the coupon code from the customer tag and display it:
{%- for tag in customer.tags -%}
  {%- if tag contains 'CRAZY_' -%}
    {%- assign coupon = tag | remove: 'CRAZY_' -%}
    <div style="text-align:center; padding:20px;">
      <p>Here's your exclusive discount code:</p>
      <h2 style="background:#f0f0f0; padding:12px 24px; display:inline-block; letter-spacing:2px;">
        {{ coupon }}
      </h2>
    </div>
    {%- break -%}
  {%- endif -%}
{%- endfor -%}
Step 7: Remove the Tag
Add a "Remove customer tags" action to remove the CRAZY_{{ couponCode }} tag after the email is sent.
This keeps the customer profile clean and allows the same method to work again if the customer receives a new coupon in the future.
7. Tips & Best Practices
- Test before going live — Use the "Send Test Event" button in CrazyRocket to verify your Flow workflow is triggered correctly.
- Check Flow run history — Go to Shopify Admin → Flow and click on your workflow to see the run history and debug any issues.
- Use Campaign Tags — Set a unique tag on each campaign so you can route different campaigns to different workflows using conditions.
- Combine with other integrations — Shopify Flow works alongside CrazyRocket's native integrations (Klaviyo, Mailchimp, etc.). You can use both at the same time.